Step-by-Step Instructions
Introduction
I’m sure at one point, you were playing a Roblox Obby, and thought “Wait, this doesn’t look too hard to make..”. Well you would be correct! Creating an Obby is one of the easiest games to make on Roblox. The genre goes back ages, close to when Roblox first released back in 2006! Now think, when you’re playing an Obby, what is the most annoying problem you come across, sometimes it’s the jumps,or falling in the void, but the main thing is the neon-colored block that kills you when you touch it. The kill brick is one of the Obby’s core elements, it adds a bit of challenge in your Obby depending on where you put it, and you can code it all in under 20 minutes (or less!).
Step 1: Setting Up Roblox Studio
If you haven't already, download Roblox Studio from the Roblox Creator Hub and log in with your Roblox account.
Open Roblox Studio and create a new place or open an existing one. Familiarize yourself with the interface, using right-click to move the camera, WASD for navigation, and E/Q for moving up/down.
Step 2: Creating the Kill Brick
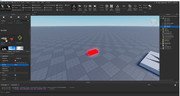
Click “Part”. A small rectangular block should spawn upon clicking. Click the part, and look to the right of your screen, in the box that says “Explorer”. The part should be highlighted if you selected it.
Rename it to “Killbrick” (or whatever other name you want it.) You can also click F2 as a shortcut for renaming things.
Now to change the brick color, click “View” on the very top of your screen. Then click “Properties”. Most of you guys should already have this open, but just in case if you accidentally closed it, this is how you find it. Look under “Appearance”, and then look at BrickColor. Select any color you want, for this project I’m picking red. Then go under “Material”, and select “Neon”.
You should have this on your screen so far.
Step 3: Scripting the Kill Brick
With the Killbrick selected, click the plus icon in the "Explorer" panel and add a "Script". Replace the default code with the following:
local Kill = script.Parent
local function kill(otherPart)
  local partParent = otherPart.Parent
  local humanoid = partParent:FindFirstChild("Humanoid")
  if humanoid then
    humanoid.Health = 0
  end
end
Kill.Touched:Connect(kill)
This script detects when a player touches the Killbrick and sets their health to 0, effectively "killing" the player.
Notes on the Script
‘local’ specifies that the function or variable is limited in scope to the block in which it is defined. This means that it can only be accessed or called from within that specific block of code. It’s telling the computer “You can only access this block of code and nothing else.”
‘script.Parent’ refers to the parent object of the script within the game hierarchy in Roblox. Game hierarchy goes something like “Parent” and “Child”. An example would be
Workspace = Parent, Killbrick = Child. But in the script’s context, it would be “Killbrick = Parent, and there is no “Child” because there’s nothing below Killbrick.
‘function’ are blocks of code that can be called through the code multiple times throughout the script.
‘kill(otherPart)’ This will be the part that touches the ‘Kill’ object, triggering the function.
‘local partParent = otherPart.Parent’ In Roblox, characters (like players) are composed of multiple parts grouped under a single model (typically called a "Model"). Accessing the parent helps identify the entire model that the part belongs to.
‘local humanoid = partParent:FindFirstChild(“Humanoid”)’ The "Humanoid" object is a component of player characters in Roblox that manages health, animations, and physics. Finding the Humanoid object is important for altering a character's health.
‘if humanoid then’ By checking if the Humanoid exists, the script makes sure that the following code only runs on characters (or models) that have a Humanoid component. In short, it’s saying “If the player touches the block.”
‘humanoid.Health = 0’ This sets the health of your character (Humanoid) to 0, which kills your character.
‘end’ is the end of the script.
‘Kill.Touched:Connect(kill)’ Remember the very first line we wrote, ‘local Kill = script.Parent’. ‘Kill’ calls this line of code.
‘Touched’ This is an event that belongs to Roblox. It fires whenever another part comes into contact with the part that has this script attached to it. (In this case, the player).
‘Connect()’ This method is used to bind a function to an event. When the event occurs, the connected function is called, thus the name “Connect”.
‘(kill)’ The function kill is passed as a parameter to the Connect method, indicating that this function should be executed whenever the Touched event occurs, like when the player touches the brick.
Step 4: Testing the Kill Brick
Click the blue "Play" button to test your Killbrick. Walk your character into the Killbrick to ensure it works as expected. If it doesn't work, double-check your code or join the ScriptCrew debug server! (linked in socials).
Step 5: Debugging Tips
If the Killbrick isn't functioning, review your script for any errors. Ensure all variables and functions are correctly defined and spelled. If necessary, you can copy and paste the provided code as a last resort.
If you continue to encounter issues, consider joining the ScriptCrew Debug server for additional support.
Step 6: Customizing Your Kill Brick
Before you go, you might want to move your kill brick, or make it a different shape! Here are some of the shortcut keys that will help you achieve just that. Remember, get used to the shortcut keys now, they will save you a lot of time later.
Select the “Move” tool on the top left to move the part along a certain axis. Shortcut key: CTRL + 2
Select the “Scale” tool on the top left to scale the part. Shortcut key: CTRL + 3
Select the “Rotate” tool on the top left to turn the part any direction you want. Shortcut key: CTRL + 4
To save your work, just hit CTRL + S. If it’s your first time saving, you can also rename your file and add a description.
That’s it! You just learnt one of the core parts of an Obby.
Conclusion
You've successfully created a Killbrick for your Roblox game! Experiment with different designs and properties to enhance your game's difficulty and aesthetic. Don't forget to save your work (Ctrl + S).